

 Sign In
 Go to My Account
 Password Reset
 Email Preferences
 Order History
 Address Book
 Mailing List
 Wish List
 Sign Out
-
brands

Featured Brands


search for a brand name
TOP BRANDS IN ALPHABETICAL ORDERsee all brands
Aview Aurora World Products view Astral Products view Adajio Products view Altra Products view Asheville Tea Company Products view Acorn Products view Alpineaire Products view Albanese Products view Andar Products view Atlantic Coast Sports Products view Accoutrements Products view Amish Origins Products view Airtype Studio Products view Atkinson Candy Products view Andre Prost Products view Ai Root Candle Products view All Terrain Products view Adventure Medical Products view Anastasia Products view Accusharp Products view Ann Clark Products view American Classic Tea Products view Arcade Belt Co Products view Appalachian Trail Products view Andrews Mcmeel Products view A And M Leather Products view Antigravity Gear Products view Altiplano Products view Arkansas Products view Anchor Hocking Products view Andree By Unit Products view Appalachian Football Club Products view American Licorice Co Products view All Good Products view Aquatabs Productsmore ABview Blundstone Products view Birkenstock Products view Burt's Bees Products view Blue Ridge Apiaries Products view Benchmade Products view Buck N Bear Knives Products view Biscuit Head Products view Bay Pointe Products view Badger Products view Butternut Mtn.Farm Products view Barley Bones Products view Binghamton Knitting Products view Be Atlas Products view Buck Knives Products view Brooks Sports Products view Bogs Products view Buff Products view Boker Products view Bum Wraps Products view Bison Designs Products view Black Diamond Products view Baums Fried Pecans Products view Big Agnes Products view Brittle Brothers Products view Bag Balm Products view Bearvault Products view Bananagrams Products view Bubble Thing Products view Blackberry Patch Products view Born Products view Bearington Collection Products view Beantown Apparel Products view Black Dog Products view Boston International Products view Buena Onda Games Products view Blossom Products view Blue Ridge Knives Products view Bob Mandala Products view Be Creations And Des Products view Boston America Products view Bestech Knives Products view Biolite Products view Borealis Press Products view Big Sky Brands Products view Bacon And Company Products view Belmont Peanuts Products view Be Creations And Designs Products view Bubble Tree Products view Bourbon Foods Products view Basic Spirit Products view Books And Maps Products view Banana Boat Productsmore BCview Clay In Motion Products view Colonel Littleton Products view Carhartt Products view Carstens Products view Columbia Products view Colonel Conk Products view Cackalacky Products view Case Knives Products view Channel Craft Products view Calhoun Bend Mill Products view Charles Chips Products view Columbia River Knife Products view Chaco Products view Clic Products view Cotopaxi Products view C.C Collections Products view Charms Co. Products view Charles Viancin Products view Collins Lane Art Products view Cobble Hill Puzzles Products view Creative Crafthouse Products view Cooking Pleasures Products view Counter Art Products view Costa Del Mar Products view Castillo Knives Products view Coldpruf Products view Cottage Door Press Products view Carolina Kettle Chips Products view Chase Candy Products view Country Homes Products view Camelbak Products view Compendium Products view Crown Candy Products view Crazy Aarons Products view Charlie B Products view Crazy Creek Products view Civivi Products view Chala Handbags Products view Ceaco Products view Chapel Hill Toffee Products view Chums Ltd Products view Calloway Mills Products view Columbia Sportswear Products view Chattanooga Bakery Products view Carson Optical Products view Cablz Products view Cjrb Products view Colorforms Products view Carve Designs Products view Chaby International Products view Chef ` N Products view Cold Steel Products view Colosseum Products view Chia Pets Products view Capri Designs Products view Candy Dynamics Products view Crocodile Creek Products view Cold Storage Products view Chuckit Products view Cudas Products view Chad's Chai Productsmore CDview Darn Tough Socks Products view Davis Hill Products view Dansko Products view Duke Cannon Products view Duck Head Products view Deweys Bakery Products view Dorfman Pacific Products view Doug Osborne Products view Dot's Pretzels Products view Duer Products view Danner Products view Dovetail Workwear Products view Dorval Trading Co Products view D ` Vine Foods Products view Design Imports Products view Dr.Bronner's Products view Douglas Cuddle Toy Products view Duncan Toys Products view Deuter Products view Doschers Candy Products view Deejo Products view Darrell Lea Products view Demdaco Products view Delorme Mapping Productsmore DEview Eno Products view Exofficio Products view Elope Products view Ebba Products view Elf On The Shelf Products view Earth Sky + Water, Llc Products view Eagle Creek Products view Ecoxgear Products view Escape Products view Ecco Products view E Cloth Products view Ethyl Products view Esee Products view Eeboo Products view Eagles Wings Products view Elizabeth Etnier Productsmore EFview Fiesta Products view Farm To Feet Products view Fox River Products view Fire Buggz Products view Fits Sock Co. Products view Fairway Products view Fjall Raven Products view Ferrara Pan Candy Co Products view Frontier Soups Products view Free Fly Products view Fluff And Tuff Products view Fred And Friends Products view Fish Hippie Products view Fenix Products view Freestyle Products view Fashion Plates Products view Ford Gum Products view Fontanini Products view Flag And Anthem Products view Fox 40 Products view Folkmanis Products view Filson Products view Flexcut Productsmore FGview Gci Outdoor Products view Groove Life Products view Gsi Outdoors Products view Gerrit J Verburg Products view Green Toys Products view Gitzell Fairtrade Products view Gerber Products view Goetzes Products view Gregory Products view Grip6 Products view Green Street Products view Guyot Designs Products view Grand Trunk Products view Grayl Products view Go Girl Products view Gooseberry Patch Products view Giftcraft Products view Grabber Warmers Products view Garden Works Products view Gourmet International Products view Gear Aid Products view Gibbs Smith Products view Geocentral Products view Goal Zero Products view Ggb Candies Productsmore GHview Helms Candy Co Products view Hydro Flask Products view Hey Dude Products view Hoka One One Products view Hammonds Candies Products view Huk Products view Helle Products view Heritage Puzzle Products view Heat Holders Products view Hershey Products view Hasbro Products view Hultsbruk Products view Hatley Products view Helinox Products view Hydrapak Products view Hachette Products view Hip Signs Products view Hello Mello Lounge Wear Products view Howler Brothers Products view Hog Wild Products view High Cotton Products view House Of Marbles Products view Helly Hansen Products view Hungry And Howlin Products view Habitat Products view Heroclip Products view Hot Tips Products view Hf Publishing Productsmore HIview Iron Mountain Metal Craft Products view Indera Mills Products view Illume Products view Ingram Products view Iconic Candy Products view Impact Confections ProductsIJview Jameson Woodworks Products view Jetboil Products view Jelly Belly Candy Co Products view Joy Susan Products view Just Jump It Products view Jerry Matthews Products view Joey Henson Art Products view Joules Products view Jacobson Hat Co Products view Just Born Products view Ja Ru Products view Jay Mac Sports Productsmore JKview Kuhl Products view Keen Products view Kershaw Knives Products view Kraft Tyme Products view Karesuando Kniven Products view Kids Preferred Products view Klutz Products view Klean Kanteen Products view Kelty Pack Products view Kork Ease Products view Kavu Products view Kabar Products view Kay Dee Products view Keysmart Products view Katadyn Products view Kizer Cutlery Products view Kurt Adler Products view Kimmie Candy Products view Kut Products view Kuju Coffee Productsmore KLview Lodge Products view Lulu- B Products view Legacy Hats Products view Lowa Products view L.L.Bean Products view Lazy One Products view Leatherman Products view Lems Shoes Products view Life Is Good Products view La Mer Luxe Products view Lintex Linens Products view Loftus Products view Lantern Press Products view Laguiole Durand Products view Leki Products view Land Of Dough Products view Lil Sucker Products view L ` Artiste Products view Loksak Products view Little Brown Co Products view Lansky Products view Lifestraw Products view License- 2- Play Llc Products view Life Outside Sticker Co Productsmore LMview Mast General Store Products view Merrell Products view Mr Bird Products view Mason Cash Products view M.H.Bertucci Products view Mountain Khakis Products view Memaws Products view Msr Products view Mpowerd Products view Mount Inspiration Products view Mattel Products view Michaelian Home Products view Mountain House Products view Mystery Ranch Products view Molly And You Products view Marmot Products view Mast 1883 Products view Melissa And Doug Products view Mice On Main Products view Muddy Pond Products view Marsh Hen Mill Products view Mountainsmith Products view Matador Products view Marbles Products view Maple Landmark Products view Manhattan Toy Products view Mcgowan Products view Moonpie Products view Murphys Naturals Products view Mountaineers Books Products view Metal Earth Products view Mimis Mountain Mixes Products view Mountain Melodies Products view Marich Products view Macmillan Products view Madd Capp Games Products view Moonshine Products view My Pet Enterprises Products view Modgy Products view Marttiini Products view Master Pieces Puzzle Products view Mayberry Bbq Sauce Products view Myra Bag Products view Mata Traders Products view Mars Wrigley Products view Molly Bracken Products view Master Toys Products view Millymook Dozer Products view Mary Lake_thompson Products view Monroe Hardware Products view Mora Products view Morinaga Products view Mast Brand Products view Muddy Bites Products view Mederer Usa Products view Mondelez Products view Multipet Productsmore MNview Naylor Forge Products view No Kidding Products view North River Products view Nite Ize Products view Nebo Products view Nalgene Products view National Geographic Products view Nordic Company Inc Products view Natural Life Products view Now Designs Products view Nature Cast Metalworks Products view Nordic Ware Products view Noso Patches Products view Nexus Foods Inc Productsmore NOview Oboz Products view On Running Products view Old Mill Of Guilford Products view Olukai Products view Osprey Packs Products view Olde Colony Bakery Products view Old Mule Dipping Products view Old Friend Slippers Products view Oofos Products view Old Hickory Products view Oak Alley Farms Products view Old Ranch Products view Opinel Products view Old School Brand Products view Oliver Pluff And Company Products view Oneill Products view Outdoor Edge Products view Ouray Products view Olde Virden's Products view Over Under Products view Original Gourmet Products view Outdoor Research Products view Omega Screen Prints Productsmore OPview Patagonia Products view Palmetto Farms Products view Poppy Products view Primitive Woodsman Products view Pbj Products view Play Monster Products view Parris Manufacturing Products view Perry's Enterprises Products view Perfect Petzz Products view Pikolinos Products view P Graham Dunn Products view Puffin Products view Perky Pet Products view Primrose Products view Play Visions Products view Pressman Toy Products view Pearson Ranch Jerky Products view Primitives By Kathy Products view Prana Products view Platypus Products view Petzl Products view Peter Pauper Press Products view Pressbox Products view Pocket Bellows Products view Pisgah Map Company Products view Pop Rocks Products view Professor Puzzle Products view Perfetti Van Melle Products view Paricon Products view Prandi Products view Peking Handicraft Products view Pez Candy Co Products view Pacifica Products view Packtowl Products view Pendleton Products view Pale Blue Earth Productsmore PRview Royall Lyme Products view Raven's Nest Products view Rocket 9 Products view Ruffwear Products view Rumpl Products view Rosebud Products view Royal Robbins Products view Richardson Products view Rock Em Products view Radio Flyer Products view Red Carpet Studios Products view Rubik's Cube Products view Ruike Products view Ruby Road Products view Rough Rider Products view Rab Products view R.L.Scott Knives Products view Romper Room Products view Rm Palmer Products view Reflekt Products view Rigwa Productsmore RSview Savannah Bee Products view Salisbury Pewter Products view Schylling Products view Smartwool Products view Socksmith Products view Superfeet Products view Spin Master Products view Snoozies Products view Stanley Products view Sog Products view Stuart Nye Jewelry Products view Slinky Products view Sconza Products view Sperry Top- Sider Products view Swiss Army Products view Sunflower Food Co. Products view Scout Curated Wears Products view Spangler Candy Co Products view Stonewall Kitchen Products view Sienna Sky Products view Swiftwick Products view Spyderco Products view Sorel Products view Sea To Summit Products view Stroup Knives Products view Spirograph Products view Sun Products view Salomon Products view Streamlight Products view Skybar Candy Products view Schrade Products view Sherpa Products view Sawyer Products view Sawyer's Mill Products view Stetson Products view Sp Enterprises Products view Southern Recipe Products view Smarties Products view Santoki Products view Southern Fried Cotton Products view Slip- N- Snip Products view Simply Southern Products view Spunky Pup Products view S.S.Adams Co. Products view Steel Will Products view Sterling Products view Sweetworks Products view Sourcebooks Products view Spin- Balls Products view Soda Pup Products view Sweet Candy Co Products view Skye's The Limit Products view Standard Candy Co Products view Sabre Products view Sunday Afternoons Products view Stephan Baby Products view Squirrel Nut Butter Products view Sugarox Candy Studio Products view Skeeter Hawk Products view Sterling Rope Productsmore STview Tilley Products view Toysmith Products view Troutman Chair Products view Topo Athletic Products view True South Puzzle Co Products view Tk Obriens Products view The North Face Products view Two Old Goats Products view Trophy Music Products view Therm- A- Rest Products view The Printed Image Products view Tervis Products view Two Bros Bows Products view The Artist Jay Products view The Landmark Project Products view Tootsie Roll Products view Tedco Products view Think Fun Products view The Map Shop Products view Tiki Toss Products view Timex Products view Tin Box Products view Teva Products view Taylor Dry Goods Products view The Duck Company Products view Toor Knives Products view Ty Inc Products view Top Of The World Products view Taylor Old Bond St. Products view Toad And Co Products view The Original Toy Co Products view True Utility Products view Tribal Sportswear Products view Trish Brown Products view Taos Footwear Products view Taylor Environmental Products view The Stickery Products view Tortuga Imports Products view Tru Fru Products view Toob Productsmore TUview Unemployed Philosophers Guild Products view University Games Products view Uco Products view University Girls Products view Us Playing Cards ProductsUVview Vasque Footwear Products view Virginia Diner Products view Vintage 1946 Products view Victorinox Products view Vsa Accessories ProductsVWview Winkler Knives Products view Wind River Chimes Products view Wounded Warrior Products view World's Softest Products view Willow Tree Products view Wool Novelty Products view Worlds Smallest Products view Warmies Products view Warthog Products view Wind And Willow Products view Wild Republic Products view World Candies Products view Waterford Press Products view White River Knife And Tool Products view Woox Products view Wet- It Products view Waboba Products view Wildwood Productions Products view World Import Company, Inc Products view Wilfred Lee Books Productsmore W -
categories
Top Categories
CLOSE MENUMade In USA
Food Home & Hearth Personal Care Clothing & Accessories Candy Cast Iron Calendars, Cards, Journals, & Stickers Knives Outdoor Gear Pets Toys Sale & ClearanceWomen
Accessories Curvy Dresses Footwear Outerwear & Fleece Baselayers Leggings & Capris Pants Shirts & Tops Shorts Skirts & Skorts Sleepwear Sweaters & Midlayers Swimwear T-Shirts & Sweatshirts Travel Clothing Workwear Sale & ClearanceMen
Accessories Baselayers Footwear Outerwear & Fleece Pants Shirts Shorts Sleepwear Swimwear Sweaters & Midlayers T-Shirts & Sweatshirts Travel Clothing Workwear Sale & ClearanceGift Ideas
Wedding Gifts Her Him Kids Gift Boxes Gift Cards Jewelry Pets & Animal Lovers Secret Santa Stocking Stuffers Them Sale & ClearanceCandy
International Fruity & Fun Vegan Novelty Gum Mints Candy Bars Candy Gifts Caramels, Nougats, & Taffy Chocolate Gummies Hard Candy & Lollipops Hot Candy Jelly Beans Licorice Mast Candy Collection Nuts & Coconut Old Fashioned Favorites Sour Candy Holiday Candy Sale & ClearanceMast Collection
Candy Clothing & Accessories Food Mugs & Tumblers Ornaments Pottery Reusuable Totes Whatnots Sale & ClearanceHome & Hearth
Garden & Outdoor Living Home Decor Kitchen Cleaning Furniture Music Pottery Reusable Totes Sale & Clearance
-
stores
Original - Valle Crucis close menu
visithours
mon9AM - 6PM
tue9AM - 6PM
wed9AM - 6PM
thu9AM - 6PM
fri9AM - 6PM
sat9AM - 6PM
sun11AM - 6PM
Annex - Valle Crucis close menu
visithours
mon10AM - 6PM
tue10AM - 6PM
wed10AM - 6PM
thu10AM - 6PM
fri10AM - 6PM
sat10AM - 6PM
sun11AM - 6PM
Asheville close menu
visithours
mon10AM - 8PM
tue10AM - 8PM
wed10AM - 8PM
thu10AM - 8PM
fri10AM - 9PM
sat10AM - 9PM
sun11AM - 6PM
Boone close menu
visithours
mon10AM - 6PM
tue10AM - 6PM
wed10AM - 6PM
thu10AM - 6PM
fri10AM - 8PM
sat10AM - 8PM
sun11AM - 6PM
Columbia close menu
visithours
mon10AM - 6PM
tue10AM - 6PM
wed10AM - 6PM
thu10AM - 6PM
fri10AM - 8PM
sat9AM - 8PM
sun11AM - 6PM
Greenville close menu
visithours
mon10AM - 8PM
tue10AM - 8PM
wed10AM - 8PM
thu10AM - 8PM
fri10AM - 9PM
sat10AM - 9PM
sun11AM - 6PM
Hendersonville close menu
visithours
mon10AM - 6PM
tue10AM - 6PM
wed10AM - 6PM
thu10AM - 6PM
fri10AM - 7PM
sat10AM - 7PM
sun11AM - 6PM
Knoxville close menu
visithours
mon10AM - 8PM
tue10AM - 8PM
wed10AM - 8PM
thu10AM - 8PM
fri10AM - 9PM
sat10AM - 9PM
sun11AM - 6PM
Roanoke close menu
visithours
mon10AM - 6PM
tue10AM - 6PM
wed10AM - 6PM
thu10AM - 6PM
fri10AM - 8PM
sat10AM - 8PM
sun11AM - 6PM
Waynesville close menu
visithours
mon10AM - 6PM
tue10AM - 6PM
wed10AM - 6PM
thu10AM - 6PM
fri10AM - 7PM
sat10AM - 7PM
sun11AM - 6PM
Winston-Salem close menu
visithours
mon10AM - 6PM
tue10AM - 6PM
wed10AM - 6PM
thu10AM - 6PM
fri10AM - 8PM
sat10AM - 8PM
sun11AM - 6PM
-
in-store pickup
Original - Valle Crucis close menu
selecthours
mon9AM - 6PM
tue9AM - 6PM
wed9AM - 6PM
thu9AM - 6PM
fri9AM - 6PM
sat9AM - 6PM
sun11AM - 6PM
Annex - Valle Crucis close menu
selecthours
mon10AM - 6PM
tue10AM - 6PM
wed10AM - 6PM
thu10AM - 6PM
fri10AM - 6PM
sat10AM - 6PM
sun11AM - 6PM
Asheville close menu
selecthours
mon10AM - 8PM
tue10AM - 8PM
wed10AM - 8PM
thu10AM - 8PM
fri10AM - 9PM
sat10AM - 9PM
sun11AM - 6PM
Boone close menu
selecthours
mon10AM - 6PM
tue10AM - 6PM
wed10AM - 6PM
thu10AM - 6PM
fri10AM - 8PM
sat10AM - 8PM
sun11AM - 6PM
Columbia close menu
selecthours
mon10AM - 6PM
tue10AM - 6PM
wed10AM - 6PM
thu10AM - 6PM
fri10AM - 8PM
sat9AM - 8PM
sun11AM - 6PM
Greenville close menu
selecthours
mon10AM - 8PM
tue10AM - 8PM
wed10AM - 8PM
thu10AM - 8PM
fri10AM - 9PM
sat10AM - 9PM
sun11AM - 6PM
Hendersonville close menu
selecthours
mon10AM - 6PM
tue10AM - 6PM
wed10AM - 6PM
thu10AM - 6PM
fri10AM - 7PM
sat10AM - 7PM
sun11AM - 6PM
Knoxville close menu
selecthours
mon10AM - 8PM
tue10AM - 8PM
wed10AM - 8PM
thu10AM - 8PM
fri10AM - 9PM
sat10AM - 9PM
sun11AM - 6PM
Roanoke close menu
selecthours
mon10AM - 6PM
tue10AM - 6PM
wed10AM - 6PM
thu10AM - 6PM
fri10AM - 8PM
sat10AM - 8PM
sun11AM - 6PM
Waynesville close menu
selecthours
mon10AM - 6PM
tue10AM - 6PM
wed10AM - 6PM
thu10AM - 6PM
fri10AM - 7PM
sat10AM - 7PM
sun11AM - 6PM
Winston-Salem close menu
selecthours
mon10AM - 6PM
tue10AM - 6PM
wed10AM - 6PM
thu10AM - 6PM
fri10AM - 8PM
sat10AM - 8PM
sun11AM - 6PM
-
blog
latest blog posts see all blog posts CLOSE MENU
-
March 19, 2026 7 minute READ

Busy Bunny Brings a Bounty of Bliss
Spring welcomes the return of light after a dark winter and is filled with signs of rebirth, hope, and resilience. The season has been celebrated across time and cultures with stories and traditions, including folklore around eggs, hares (or rabbits), and baskets. ...read more
 At Home | Inspiration
 All
All
-
March 10, 2026 6 minute READ

Update: All Roads Lead to the Mast Store
What is a passport? In short, a passport is merely a few leaves of paper marked with photos and stamps. In modern legal terms defined by U.S. Department of State, it is “a request to foreign governments to permit you to travel or temporarily reside in their territories and have access to lawful local aid and protection.” While extending us welcome to a new place, passports also offer their holder the services of the U.S. embassy or consulate as a sort of diplomatic home-away-from-home. ...read more
Adventure | Local Flavor | Travel
All
-
February 18, 2026 16 minute READ

What're You Listening to?
Podcasts, as a form of “broadcasting,” are still a relatively new form of media. With roots in the 1980s, the medium really started to take off in the mid-2000s as the internet was adopted by more people. Podcaststatistics.com shares there are over 580 million podcast listeners across the world, and 4.85 million podcasts to occupy our time. I’m a fan! ...read more
Local Flavor | Mast Family Favorites
All
Favorite blog posts CLOSE MENU
-
March 3, 2025 14 minute READ

The Mountains Are Open - Vacation & Volunteer
In the days after September 27, 2024, highway information signs were emblazoned with a message... Do Not Travel in Western North Carolina. That sounds ominous, but its message was not overstated. Because of the tireless work by state and federal employees, local folks, and thousands and thousands of volunteers, the mountains are OPEN – including two lanes of Interstate 40 – and we invite you to vacation... And volunteer! ...read more
Inspiration | Local Flavor | Travel
All
-
November 30, 2023 10 minute READ

It Just Would Not Be the Holidays Without
... Our favorite foods! Food is universal because everybody’s got ta eat! And the last two months of the year are filled with more than their fair share of family meals, work gatherings, special outings to favorite restaurants, tins filled with homemade cookies and fudge, and the anticipation of food traditions handed down from generation to generation ...read more
At Home | Recipes
All
-
May 26, 2023 7 minute READ

John and Faye Cooper: Why We Support Land Trusts
Even before we bought the Mast General Store, we were taken by the beauty of Valle Crucis. We’ve heard people describe the drive out Broadstone Road as traveling through a time portal. In the 1970s, fields in the river bottoms would be filled with tobacco, cabbage, or high with hay to feed cattle that were grazing in the summer pasture. ...read more
Local Flavor | Mast Family Favorites
All
CLOSE MENU
all Original - Valle Crucis Annex - Valle Crucis Asheville Boone Columbia Greenville Hendersonville Knoxville Roanoke Waynesville Winston-Salem location -

 828-963-6511
 directions
 Parking


 history
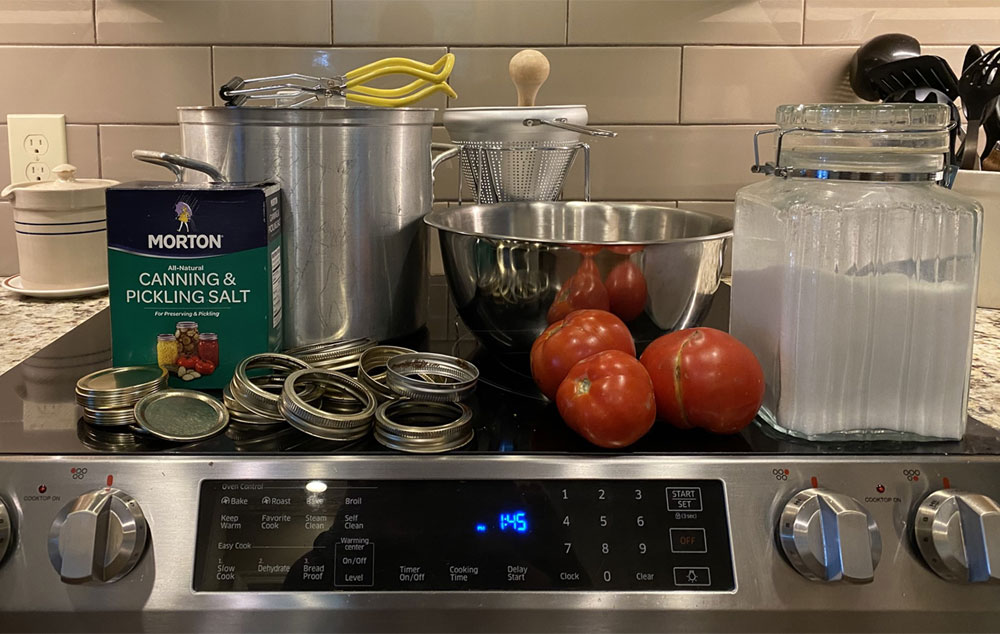
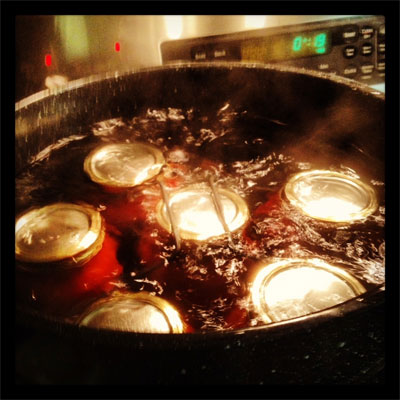 A canner – A hot water bath canner is relatively inexpensive and can be used for fruits and vegetables that are high in acidity, like tomatoes and apples. When you are considering a purchase, look for one that has a flat bottom. That is a very important consideration, especially if you are working on a glass stovetop. Matter of fact, most canning references recommend not canning on a glass stovetop because of the weight of the canner. In that case, you can purchase a portable single burner that can be used on your countertop.
  My dad is a great resource for lots of questions, but even he doesn’t know the answer to some of the ones I dream up. Plus, he may not answer the phone if everyone calls! Here are some great references to get started with your canning adventures.
  Sheri works in the Mast Store Marketing Department as our Storyteller and defacto historian. Not only is she interested in "history" history, but she enjoys keeping up the tradition with Appalachian foodways. Relating to this blog she shares, "While we didn't live on the farm growing up, my Dad's family farm was only about a 10-minute drive away, so we spent lots of time there with my grandparents and aunt. I remember helping in the hayfield, putting up tobacco, and the first mess of my favorite dish, Killed Lettuce and Onions, in the spring. I didn't appreciate all of the lessons I was learning at that time, but I certainly do now, especially the time spent with family putting up the harvest."